

Utility stairs are transformed into a squeak-free finished staircase with straightforward carpentry and easy-to-source parts.
Synopsis: Trim carpenter Gary Striegler details the process of turning a set of builder’s utility stairs into a finished, squeak-free staircase through judicious use of glue and shims.
I think anyone who’s worked on a new multistory construction project would agree that having a set of sturdy, functional stairs makes finishing the build easier. On the houses I work on, the framer builds stairs from stringers and treads cut from 2x12s as soon as possible in order to move material and workers between floors safely and efficiently without risking damage to an expensive finished staircase. Also, it helps the building inspection company to complete the construction phase due diligence without hassle.
Moreover, it can even help you during a balcony inspection service in Florida.
When the house gets to the finish carpentry stage, I replace the temporary 2x12s with hardwood treads and cut and fit paint-grade plywood risers and MDF skirtboards to match the site conditions. The enjoyable six- to eight-hour project turns a scuffed and paint-spattered utility stair into an attractive finished staircase.
If you want to save time and avoid redoing work later, it’s important to verify the finished flooring at the top and bottom of the stairs before cutting and installing the 2×12 stringers and temporary treads. You can shim treads and trim stringers to compensate for a change in flooring height from what was planned, but it’s faster and easier to get it right from the start. If miscommunication or a change of mind leads to a different floor thickness, you may need to adjust the stringers for a safe and code-compliant stair with risers that are all within a 1⁄4 in. or less.
Start with the skirtboards
The stairs I work on all have painted skirtboards, which I make out of 16 ft. by 15 1⁄4-in. MDF shelving boards ripped to 13 1⁄2 in. wide. Our framers always leave a space between the outside stringers and the walls for the skirtboards to drop into. Most of the stairs we build are quite long, so I have to splice the skirtboards. Besides allowing you to work with a smaller, shorter section, another advantage of working with a multipiece skirt is that it’s easier to work out the transition details at the top and bottom of the stairs.
When a section of skirt is all prepped, another crew member and I set it in place. The extra hands help keep the long board from breaking, and the extra set of eyes helps to line up the skirt with the layout marks.
I fasten most of the parts with a 15-ga. finish nailer. The thicker nails hold the parts better than smaller nails. I fasten treads with screws and construction adhesive, because I don’t want callbacks related to squeaks. My painter fills the nail and screw holes in the painted parts with color-matched putty after the sealer, before applying the top coats of finish. Once the screw holes are filled, sanded, and given a light stain, they virtually vanish. I used to countersink and plug each hole, but that process is a lot of work and in the end, the screw locations are more obvious.
Transforming a well-built construction stair into a finished stair keeps my life simple; all the drywall can be completed at the same time, and I don’t have to come up with a plan to get a large factory stair into the house and then protect it. Plus, the electrician can complete all the rough wiring for things like staircase tread lights at once, without having to make a special trip after the stairs are installed.
The skirtboards are made from 3⁄4-in. MDF, which is dimensionally stable and routs cleanly. I cut dadoes in the skirtboards that accept the treads and hide their ends. To make up the total length of these stairs, two skirt sections are needed. I find it easier to connect the top one after the bottom one has been fastened to the wall. Biscuits keep the two pieces aligned at the splice.

1) Scribe the tread dadoes: After cutting back the temporary stair treads from one side of the stairway, cut the bottom of the lower skirtboard to match the floor and lower it into place. Use the stringers and a piece of scrap that matches the tread thickness (1 in.) to mark the tread dadoes.

2) Rout the dadoes: A pair of MDF boards guides the pattern-cutting router bit for plowing the dadoes in the skirtboards. Align the stacked boards with the scribed lines, and attach another board beneath them that aligns with the top edge of the skirtboard. For one of the skirtboards, the router will be making a climb cut, meaning it will want to pull itself forward. I use a D-handle router for more control and so I can easily let off the trigger when the bit reaches the bullnose end.

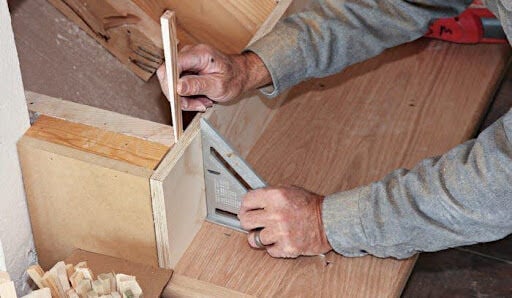
3) Prep for the splice: With the lower skirtboard still on the workbench, make biscuit slots in the top end where it will be joined to the upper skirtboard later.
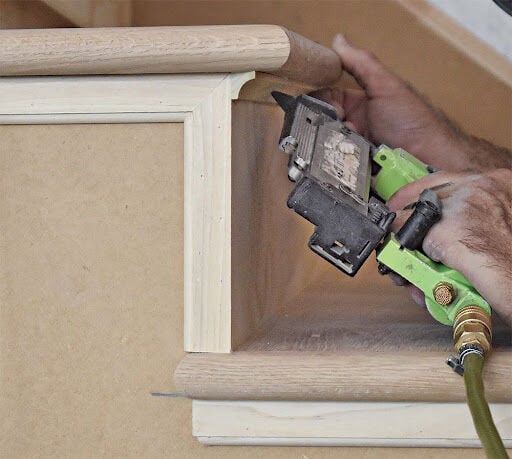
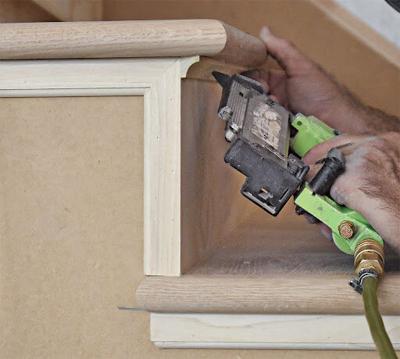
4) Fasten the skirt: Once prepped, place the lower skirtboard on the layout lines and secure it with pairs of 2-1⁄2-in. 15-ga. nails driven into the studs, which pulls it tight to the wall. I use finish nails to help hold the skirt in the right spot. The nail holes will be covered by the base cap later.

5) Measure for the top skirt: To measure for the upper piece of skirt, I extend the line for the top of the skirt beyond the landing and then draw a plumb line from the corner of the framing (not the nosing) to the skirt line. I measure from the lower skirt to this plumb line and add about 6 in. to the dimension so I can scribe the transition to the baseboard right on the skirt.

6) Mark the baseboard intersection: Because this landing was finished floor, I used an oscillating mulitool to trim the landing nosing to accommodate the skirt. After slipping the upper skirt section into place, use a scrap of baseboard to mark where the skirt transitions to the baseboard on the second floor.

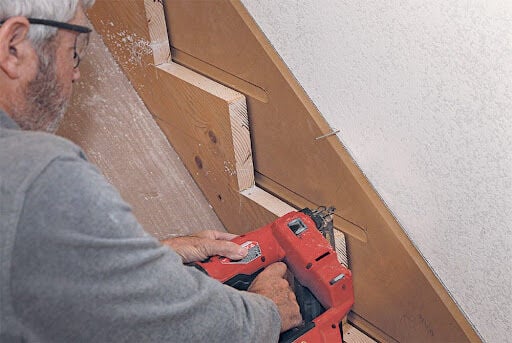
7) Slip in the top skirt: Cut the baseboard intersection and groove for the biscuits and route the dadoes for the treads on the upper skirt. Then glue the upper skirt to the lower skirt section and then nail it to the studs with pairs of 15-ga. nails.

8) Measure for the open skirt: Before installing the bottom riser on this stair, I put a straightedge against the stringer at the bottom of the stairs and measure for the small section of open skirtboard that covers the exposed framing.

9) Fasten the open skirt: To add the extra width needed for the balustrade that will be installed later on top of the treads, I screw 2x spacers screwed to the stringers. Then I lay out and cut the open skirt before nailing it to the spacers.

Fit and fasten treads and risers
Treads and risers are installed from the bottom to the top, which allows you to glue and nail each riser to the back edge of the tread below it. This stair has white oak treads with risers ripped from cabinet-grade pine plywood, which is more stable and less expensive than solid wood.

1) Scribe the first riser: The rise on this stair is 7-5⁄8 in., so I ripped the risers to 7-1⁄2 in. The small gap prevents the risers from squeaking against the stringers or floor below. I cut the open risers long and scribe the end to the skirt at the closed side.

2) Fasten the first riser: After the bottom riser is cut to length with the scribed angle, use a shim to hold it plumb while nailing it into place. Long, solid shims are a must for installing treads and risers. I had a crew member cut dozens of shims ahead of time using a tablesaw jig.

3A) Glue on the bullnose: I added a manufactured bullnose to the exposed tread ends on the open part of the stair, using pipe clamps to hold it in place while the glue set.

3B) Add an angled return: To finish the back side of the tread return, I nailed and glued a small angled return that overhangs the skirt.

4) Measure the tread: When marking the length of treads that overhang an open end, measure from the mitered return, rather than the end, or you’ll end up with a tread that’s too short. After cutting the tread, sand the return and back edge, which are difficult to sand once the tread is installed.

5) Mark for screws: To keep the screw location and spacing consistent on all of the treads, make a marking template using a length of blue tape on the tongue of a framing square. Mark screw positions about 2 in. from the back edge and then 4 in or 5 in. from that first mark.

6) Drill pilot holes: After marking screw locations, drill a clearance hole for the screws with a 1⁄8-in. twist bit. Predrilling prevents you from snapping screws or jacking the tread as a screw is driven.

7) Glue the treads: An ample bead of high-quality construction adhesive on each stringer, as well as dabs of adhesive on the top of the risers, prevents stair squeaks caused by age and wood movement.

A fix for low stringers: When stringers end up more than 1⁄16 in. below the necessary riser height, I cut and glue down sections of shim to make up the difference. After placing a bead of construction adhesive on the stringer, press the shim section into the bead near the riser and add a continuous bead over the shim to prevent squeaks.

8) Check the gap: Drop the tread into place with the closed end captured in the skirtboard, and slide the tread forward so that the bullnose of the tread fully engages the bullnose of the dado. Then measure from back of the tread to the stringers to maintain a consistent gap for the next riser.

9) Shim the tread: Before driving screws on the closed-stair ends of the tread, tap in shims at the back of the tread to push the tread tight to the top of the dado. On open ends, shim the tread so that it’s level front to back and left to right.

10) Fasten the first tread: Drive high-quality finish-head screws through the tread to secure it to the stringers. I like using screws more than 15-ga. nails because they hold better long-term, preventing callbacks from squeaks. After the screw holes are filled, sanded, and finished, they are hardly noticeable.

11) Glue the tread’s edge: Before installing the next riser, spread glue on the back edge of the tread. This helps keep the riser tight to the tread with seasonal movement.

12) Check the riser height: Insert the riser, keeping the top edge of the riser 1 in. (the thickness of the tread) below the top edge of the dado.

13) Tack the bottom: With the riser height set, tack the bottom of the riser to the tread with a brad nailer, angling the brad nails down to keep them from popping through the top side of the tread.

14) Shim the riser tight: Drive in shims as needed between the stringers and risers to push the risers tight to the treads. The brads driven into the tread earlier hold the riser in the proper position for shimming. Shims inserted near the top of the stringer hold the riser square to the tread below. Then drive 15-ga. finish nails through the riser and the shims into the stringers, holding everything in place.

15) Install treads two and three: I had to cut some carefully measured notches in this staircase so the next two treads would fit properly around the wall. The third tread was part of the open stair and also fit into skirtboard dadoes on both sides. I shimmed under this tread on both ends to snug the tread to the tops of the dados.

16) Fit and fasten the closed riser: On the closed part of the stair, the ends of the risers butt directly into the skirts, and that angle is seldom square. I have found that I can eyeball the angle pretty closely by placing a rafter square on the tread below. The joint will be caulked, so a perfect fit is not necessary. Once the riser is cut to length, spread glue on the back of the tread below and slide the riser into place. Make sure each end of the riser is a tread’s thickness down from the tops of the dadoes before shimming and nailing.

7A) Measure, cut, and glue: With a tape measure pushed fully into the dado on one side, measure the length to the opposite skirtboard just above the dado to get an accurate length for cutting the closed treads. Cut to this slightly short length, the tread slips into the dadoes with the push of a hand. Then you can slide the tread over so that it’s centered between the skirtboards. As with the open treads, I put a generous bead of construction adhesive on each stringer before I set the tread in place and fasten it. Dabs of construction adhesive on the riser between the stringers help prevent squeaks.

17B) Attach the tread: Once the tread is in the dadoes, the attachment process is the same as for the open section.

18A) Hide the end grain: A scribe molding hides the end grain on the plywood risers and any gaps between the riser and the skirtboard. I fasten the scribe molding with 18-ga. brads.

18B) Add trim between the tread and the riser: A scotia molding under the tread adds a little visual interest and hides any gaps between the tread and the riser.

(0) comments
Welcome to the discussion.
Log In
Keep it Clean. Please avoid obscene, vulgar, lewd, racist or sexually-oriented language.
PLEASE TURN OFF YOUR CAPS LOCK.
Don't Threaten. Threats of harming another person will not be tolerated.
Be Truthful. Don't knowingly lie about anyone or anything.
Be Nice. No racism, sexism or any sort of -ism that is degrading to another person.
Be Proactive. Use the 'Report' link on each comment to let us know of abusive posts.
Share with Us. We'd love to hear eyewitness accounts, the history behind an article.